
Interactive Paper Plate Rocket Craft – Blastoff to Space!

This interactive paper plate rocket is more than just a craft – kids can count down to blastoff, and then pretend their rocket is soaring into space!
When I was a teenager my family took a vacation in Florida a few hours north of Cape Canaveral. NASA had a planned space shuttle launch while we were there, and my dad wanted us to go.
Regretfully, I was more interested in boogie boarding and working on my tan. To this day, I regret that we talked him out of it.
How exciting that would’ve been, watching that massive vehicle launch into space!
Now I’m trying to redeem myself by getting my own kids more interested in space than I was back then. So far it’s working!
RELATED: Paper Plate Solar System Craft
Well, it helps that we now live in Houston, where we can visit the cool space shuttle mockup at Space Center Houston, take a tour of Johnson space center, and see the real rockets from the 1960’s. Plus, now you can learn about the Orion spacecraft that’s scheduled to go around the moon in late 2019. that went around the moon in 2026.
Exciting stuff! And it’s worthy of some fun crafts. A few years ago we made these awesome shiny rocket crafts. This week I created a different twist on the same rocket theme.
Paper Plate Rocket
Materials
You may already have everything on hand to make these interactive paper plate rockets. Here’s what you’ll need:
- Paper Plate
- Craft knife (optional)
- Black Paint
- Pale Yellow Paint
- Paintbrushes: 1 large and 1 small
- Thin Cardboard – a cereal box from your recycling is perfect
- Aluminum Foil
- Permanent Markers, such as Sharpies
- Construction Paper
- Scissors
- Tape
- Craft Sticks
- Paint Smock or Old Shirt
Preparation
You may want to do these few steps before kids are underfoot.
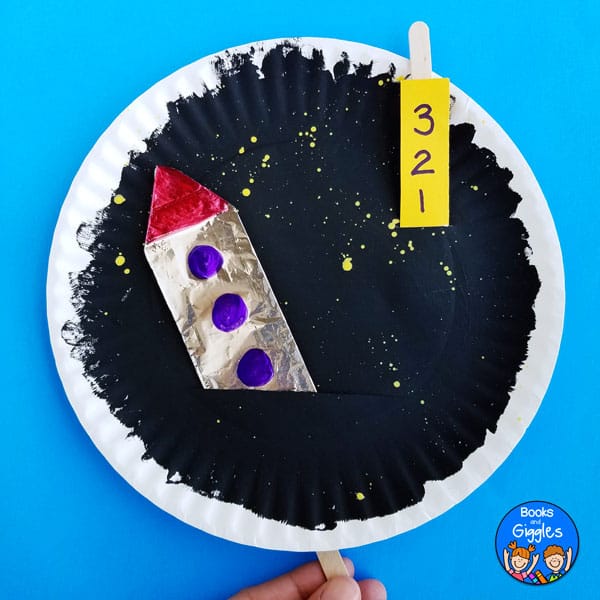
- Use a craft knife or scissors to cut slits in the plate, as shown below.
- Cut out a rocket shape from the cardboard, and wrap it in foil.
- Protect surfaces and clothing.

Instructions
For younger kids, the process of painting will be fun in itself. Older kids will likely be more interested in decorating their rockets.
- Paint the paper plate black. Let dry a bit.
- Dip a small paintbrush in the yellow paint, and flick paint “stars” onto the black plate. Let dry.
- Meanwhile, decorate the foil rocket with permanent markers.

- Cut out a strip of paper and write 3, 2, 1 on it. (For younger kids you can write the numbers in pencil for them to trace.)
- Tape the rocket and the countdown paper to craft sticks.
- Insert the moving parts into the paper plate from the back side, and play!

For older kids ready to work on counting down from 10, you may like to incorporate this rocket ship backwards counting printable too.
We haven’t had the chance yet to see a real rocket launch, but this little rocket craft version sure was fun to pretend with.

Such a cute craft idea with paper plate! I especially loved the 3,2,1 paper strip idea 🙂 This will surely bring lots of fun during the rocket launch!