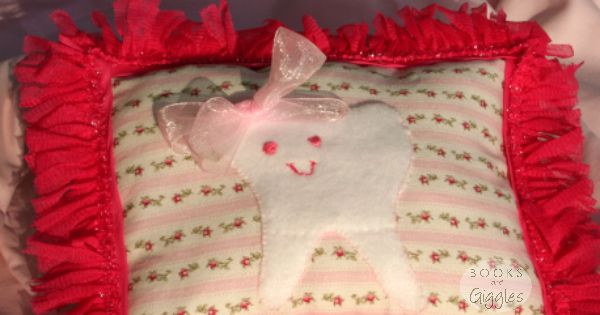
9 Easy Steps to a Glamorous Tooth Fairy Pillow
We have three loose teeth here, that I know of. My sweet Twin A has two loose at once, and little Twin B is working hard on wiggling one too. There’s nothing like the increasing waggle of a first loose tooth to get a mom scrambling for tooth fairy pillows!
I like to sew every once in a while, but I’m not very good. I’m completely inept at following patterns. Making something without a pattern, though? That’s fun!
I even have a sewing machine.
It’s still going strong, and has lots of attachments that I don’t know how to use. But I don’t need anything fancy for a simple pillow.
Gathering Supplies
I dug into my fabric stash and found some pink, flowery cotton that both my girls liked. (It’s not always easy finding something they both like!)
Then, on a quick trip to the fabric store, I fell in love with this fun, sparkly hot pink fringe.
I wasn’t sure exactly how I was going to make it work, but I had to have it.
I wasn’t sure exactly how I was going to make it work, but I had to have it.
Luckily, the store had a resident sewing expert who steered me to the bias tape. It was just what I needed to make the project super-easy! I also picked up some white fleece and some pretty ribbon. I already had everything else I’d need.
Supply List
If you want to make your own, here are the supplies you’ll need:
- Fabric for pillow
- Fleece for tooth shape
- Wide bias tape
- Fringe Ribbon (for bow)
- Thread
- Embroidery thread (for eyes & mouth)
- Polyester batting
- Needles, pins
- Hot glue gun (optional)
Instructions
1. Cut out the fabric. Just eyeball the size you want and add a ½” seam allowance on all sides. Cut 2 identical shapes, for front and back.
2. Then, using my template, cut out a tooth shape. I have a great trick for cutting out felt in my weather doll tutorial that works just as well on fleece. Or you can just cut and trace.
3. Sew the tooth to one of the pillow fabric pieces, leaving the top open to make a pocket. Hand
sewing with a blanket stitch looks pretty. It’s also your only choice if, like me, you forget to do this step until later! I’ll be machine stitching my other daughter’s pillow.
sewing with a blanket stitch looks pretty. It’s also your only choice if, like me, you forget to do this step until later! I’ll be machine stitching my other daughter’s pillow.
4. Pin the two fabric pieces together right side out. Yes, right side out, not inside out like you’d normally do for a pillow.
5. Stitch around the perimeter, leaving about 2 inches open in the middle of one side for
stuffing later.
stuffing later.
6. Sew the bias tape on, mitering the corners if you know how. If you don’t, just round the corners.
Your fringe will pretty much cover it all up anyway.
Your fringe will pretty much cover it all up anyway.
7. Here comes my secret weapon! Hot glue the fringe on along the thread line
where you sewed the bias tape on.
where you sewed the bias tape on.
8. Using embroidery thread, sew eyes and mouth on the tooth. I found it easier to do this with it all secured, even though I had to reach my needle inside the pocket. I barely know any actual embroidery stitches. I mostly just stitched until it looked the way I wanted.
9. Stuff the pillow and stitch up the opening.
All that’s left to do is snuggle up with your little girl and read a good tooth fairy book. We’ve been delving into regular fairy books, but need to find some tooth fairy ones.
Before I hit the library, I need to hurry and make a second pillow. Good thing it’s an easy project!For more easy projects and picture book related reading, check out a few of my other posts:


